Black Ice Software - May 2010
The new Agent Printers have arrived!
Black Ice Software announces the release of version 12.50 of the Monochrome, ColorPlus, and PDF printer drivers.
The new release includes virtual Agent Printers for adding dedicated, task-specific printers.
Agent printers are based on the Black Ice Printer Driver and have all the features of the base printer driver. Separate Agent printers can be
created for each routine task, like creating and emailing PDF reports, labeling legal documents, creating faxable documents or uploading to
SharePoint without having to repeat printer configuration each time. These virtual Agent printers can be created, configured and deleted
using the Black Ice printer manager. Add as many Agent Printers as necessary, there is no limit (Most office task can be handled with 3-4
pre-configured Agent printers).
Existing customers will enjoy a significant discount when upgrading to the Agent Printer technology. Please contact Black Ice Sales for more information at sales@blackice.com.
Note to Developers: Each agent printer acts as an independent printer driver as long as the base printer driver is installed. The Resource Toolkit - API can be used with each Agent Printer independently. Currently Agent Printers are available in the non-OEM printer drivers only.
One can manage Agent Printers with the Black Ice Printer Manager. (Administrator privileges
are necessary)
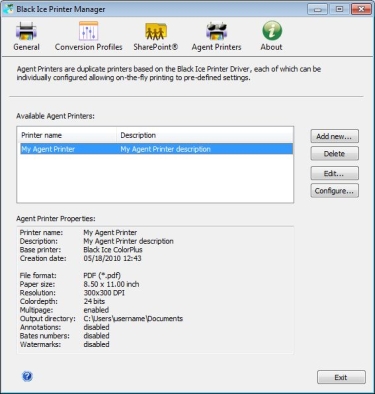
Available Agent Printers
The Available Agent Printers section lists all the Agent Printers that currently exist on the system. Highlight an Agent Printer to view the printer's properties,
modify, or delete printer. A quick overview of all Agent Printer's settings is available in the "Agent Printer Properties" section.
Adding a new Agent Printer
To add a new Agent Printer, click the 'Add New...' button.

- Printer Name - type the name of the printer as it should appear on the system
- Description - enter a description of the Agent Printer
- Base printer - select the desired Black Ice Printer Driver to base the Agent Printer from
Note: The Agent Printer will be created according to the
default settings of the base printer, and will not take
the actual configuration of base printer. For example if
one changed the output format of the ColorPlus printer from the default PDF to TIFF, than the Agent
Printer's default output format will be PDF and not TIFF. Of course, Agent Printer's settings
can be changed anytime in the
Printer Manager or directly from its Printing Preferences.
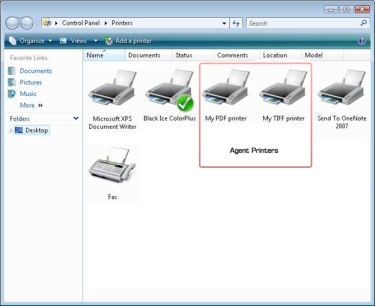
Select a name for the Agent Printer and it will show up amongst
the printers just as any other printer:
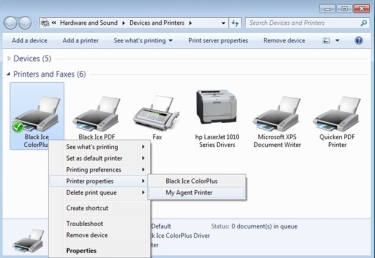
Please note: Windows 7 and Windows 2008 R2 group the printers using the same driver and port to one item in the Devices and Printers
dialog. Since the Agent Printers use the same driver and port as their parent Black Ice Printer Driver, they will be grouped accordingly:
To see the Agent Printers separately there is a workaround. Please refer to the Ungrouping Agent Printers from their parent printers on Win 7 and 2008 R2
On Windows 7, Vista and Windows 2008 the following
window will come up when trying to add, edit, or delete an Agent Printer:
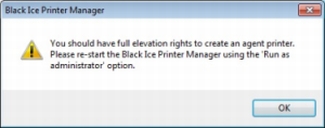
This is due to the User Account Control (UAC) technology and security infrastructure introduced in Windows 7, Vista and Windows 2008. On these
operating systems full elevation rights are needed to add, edit or delete an Agent Printer. Please restart the Black Ice Printer
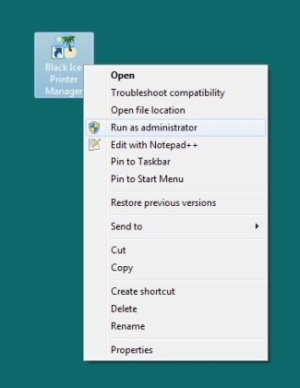
Manager using the 'Run as administrator' option. (Right click on the Printer Manager icon on
the desktop, and choose 'Run as administrator'
and Click Yes on the UAC window.)
Editing an Agent Printer
After an Agent Printer is created, the Printer Name and Description can be edited at any time. To edit an Agent Printer, highlight it in the
'Available Agent Printers' section, and click the 'Edit...' button. (the base printer is grayed out and cannot be edited)
Configuring Agent Printers
To configure an Agent Printer, highlight it in the 'Available Agent Printers' section, and click the 'Configure...' button to launch the
Printing Preferences for the select printer.
Email settings cannot be configured through the Printing Preferences. To configure email settings for an Agent Printer, go to the General tab,
choose the Agent Printer and configure email properties just like for any other Black Ice printer.
Deleting Agent Printers
To delete an Agent Printer, highlight it in the 'Available Agent Printers' section, and click the 'Delete' button.
Note: when the base Black Ice Printer is uninstalled, all corresponding Agent Printers will be deleted!
Ungrouping Agent Printers on Win 7/2008R2 hack
On Windows 7 and Windows 2008 R2 Agent Printers will show as a single printer in Devices and Printers dialog. This is a new feature of the
Windows 2008 R2 and Windows 7 operating systems. The printers using the same port and driver will be displayed in one group in the Devices and
Printers dialog.

There exists a workaround which will show all the printers separately in a custom folder which will reside on the desktop. To do this, a new
registry key needs to be added.
Open the registry editor and navigate to the following location:
HKEY_LOCAL_MACHINE\SOFTWARE\Microsoft\Windows\CurrentVersion\Explorer\Desktop\NameSpace
- Right click on NameSpace and choose 'New Key'
- Name the key:
{2227a280-3aea-1069-a2de-08002b30309d}
...be sure to include the {brackets}
- In the right pane, edit the value of 'Default' and change it to 'Printers':
- Close Registry Editor and refresh the desktop (F5).
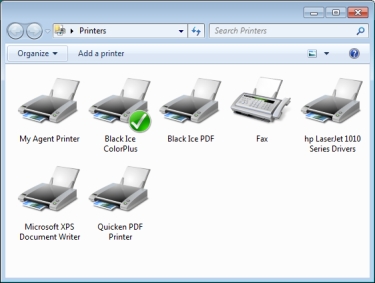
A new folder called 'Printers' will appear on the
destop which will show all the printers
separately.
|


