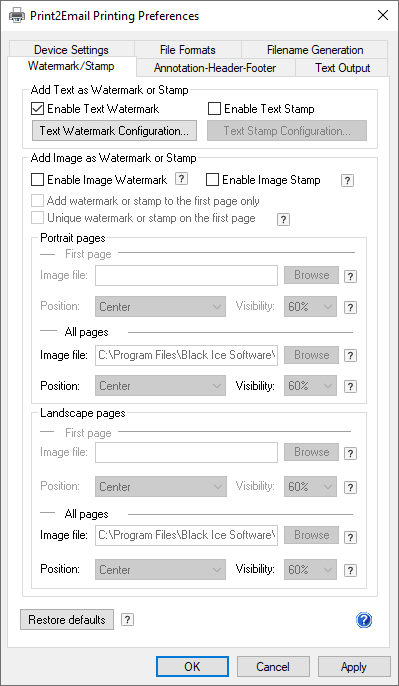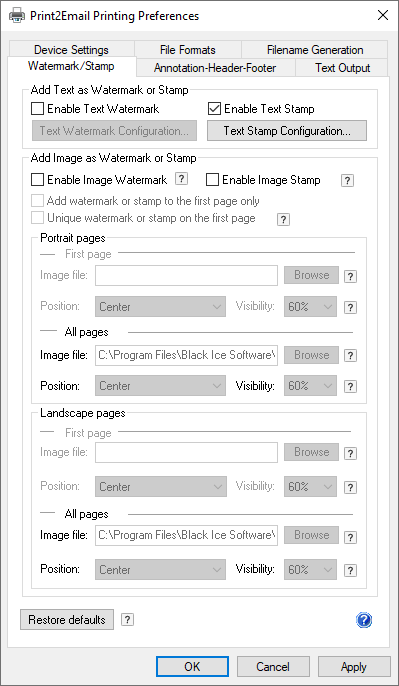
The user can add specific text as a watermark or stamp to the printed document, to mark documents with information relevant to their creation, distribution or storage.
To configure the Printer Driver to add a custom text watermark/stamp to a printed document, please navigate to the Printing Preferences > Watermark/Stamp tab, and check the Enable Watermark option.

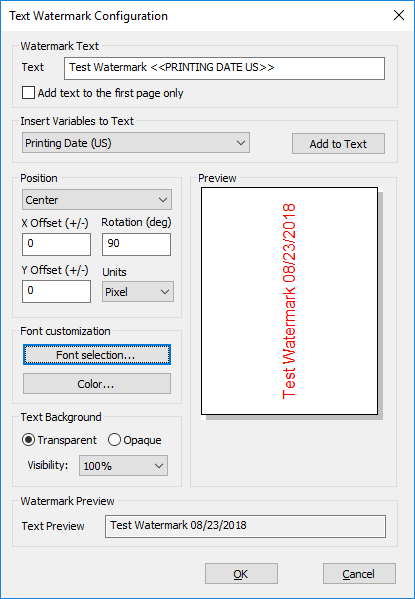
The text watermark/stamp can contain a user-defined text and important information such as page number, time, date, document title and more, and also makes the printed document to look more professional. The position, font type, color, and size of the text used for the watermark/stamp can be configured.
The Printer Driver converts the watermark/stamp to the format of the page that is currently printed. For example, if a colored text watermark is specified as a watermark and the Printer Driver is set to generate monochrome (Black & White) documents, the watermark is dithered to monochrome and the monochrome text is added to the page as a watermark.
Watermark/Stamp Text
Specifies a user-definable string that appears in the watermark/stamp text. The watermark/stamp text can contain any ASCII characters and variables.
Font Style
Users can customize the font type, size, and style of the text watermark/stamp on the Font window.
Color
Users can customize the color of the text watermark/stamp.
Insert variable
One can add multiple variables to the text, by clicking on the Insert Variable button, selecting a variable from the dropdown menu on the Insert Variable window, and clicking on the OK button.

The following variables are available:
<<PRINTING TIME>> - the time of the print job, in the following format: HH:MM:SS PM/AM
<<PRINTING DATE EU>> - the date of the print job, in the following format: DD/MM/YYYY
<<PRINTING DATE US>> - the date of the print job, in the following format: MM/DD/YYYY
<<PRINTING DATE ASIA>> - the date of the print job, in the following format: YYYY/MM/DD
<<DOMAINNAME>> - the name of the domain where the printing user is currently logged on to print
<<USERNAME>> - the name of the printing user
<<COMPUTERNAME>> - the computer’s name where the printing has been initiated
<<IPADDRESS>> - the IP address of the computer where the printing has been initiated
<<DOCNAME>> - the name of the document that is currently printed
<<PAGENUM>> - the current page number
<<PRINTERNAME>> - the printer’s name which printed the document
<<COPY>> - Specifies the number of the current copy. For example, if redirecting two copies to a physical printer, then the first copy has number 1 on every page and the second copy has number 2 on every page.
Position
Specifies the position of the watermark/stamp. Position can be configured to Top Left, Top Right, Center, Bottom Left, or Bottom Right by selecting an option from the Position dropdown menu.
Rotation
The user can select the rotation angle of the selected watermark/stamp on the printed document.
Horizontal and Vertical distance
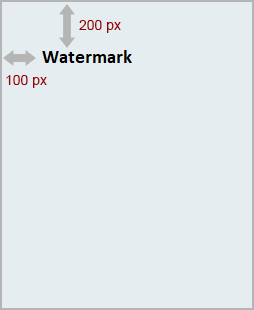
The Horizontal and Vertical distance settings specify the distance relatively from the edge of the page and the specified position. The units used to specify offsets are set with the Units dropdown list. Supported units are millimeters, inches, and pixels.
For example:
If the watermark is set to Top Left, the Horizontal distance is 1, the Vertical distance is 2 and the units are inches, then the watermark will be positioned to 1 inch of distance from the left edge of the page and 2 inches of distance from the top edge of the page.

Add to pages
Enter page numbers and/or page ranges separated by commas counting from the start of the document. To add watermarks/stamps to every page, please leave the textbox empty.
For example, type 1,2,5-12.
Font Size
The user can adjust the font size of the text watermark/stamp, by adjusting the Font Size slider.
Visibility
Background
Specifies whether to use opaque or transparent background for the watermark/stamp. The following options are available:
Opaque: The background of the text watermark/stamp is opaque.
Transparent: The background of the text watermark/stamp is transparent.
Opacity
The opacity value determines how visible the watermark/stamp is on the page. A lower percentage value produces a lighter watermark/stamp; and higher value produces a more visible watermark/stamp. With opacity set to 100% the watermark/stamp will be completely opaque, covering the printed document.
Preview
Shows the preview of the configured layout and size of the watermark/stamp.
Layer
By selecting an option from the Layer dropdown menu, the user can select whether to place the watermark or stamp above or behind the page content. The following options are available:
On top of the page as Stamp
If this option is selected, the configured image will be placed on the top of the page content. The stamp will cover the page content.
Behind the page as Watermark
If this option is selected, the configured image will be placed behind the page content. Background, text and pictures will cover the watermark.
Watermark and Stamp List
In the Watermark and Stamp List the preconfigured and the user-configured text watermarks are available.

Add to list
The currently configured watermark or stamp can be saved for future use by clicking on the Add to List button and entering a name for the watermark/stamp. Every configuration (font size, rotation, position etc.) of the current watermark/stamp will be saved.
The saved watermarks/stamps also can be used when applying watermarks and stamps to a document during saving, using the Save As window. To read more, please see the Add Text Watermark or Stamp on the Save As Dialog section.
View
The selected watermark/stamp is loaded as the configured watermark/stamp on the Printing Preferences window.
Delete
The selected watermark/stamp configuration will be deleted.