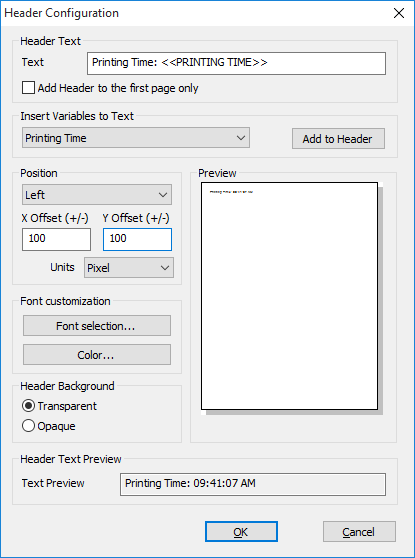
Enable Header option adds the header to the printed document. The Header can contain important background information such as user-defined text, page Number, time, date, document title and more, and also makes the printed document to look more professional.

Text: Specifies a user-definable string that appears in the Header text. The Header text can contain any ASCII characters and the following variables:
· <<PRINTING TIME>> –the time of the print job, in the following format: HH:MM:SS PM/AM
· <<PRINTING DATE EU>> –the date of the print job, in the following format: DD/MM/YYYY
· <<PRINTING DATE US>> –the date of the print job, in the following format: MM/DD/YYYY
· <<PRINTING DATE ASIA>> –the date of the print job, in the following format: YYYY/MM/DD
· <<DOCUMENT TITLE>> – the Document Title specified in the PDF Description
· <<DOCUMENT AUTHOR>> – the Document Author specified in the PDF Description
· <<DOCUMENT SUBJECT>> – the Document Subject specified in the PDF Description
· <<DOCUMENT KEYWORDS>> – the Document Keywords specified in the PDF Description
· <<DOMAINNAME>> - the name of the domain where the printing user is currently logged on to print
· <<USERNAME>>- the name of the printing user
· <<COMPUTERNAME>>- the computer’s name where the printing has been initiated
· <<IPADDRESS>>- the IP address of the computer where the printing has been initiated
· <<DOCNAME>>- the name of the document that is currently printed
· <<PAGENUM>>- the current page number
· <<PRINTERNAME>>- the printer’s name which printed the document
· <<COPY>> - Specifies the number of the current copy. For example, if redirecting two copies to a physical printer, then the first copy has number 1 on every pages and the second copy has number 2 on every pages.
Select the variable from the dropdown list, and click on Add to Header button. During the printing, the printer driver will substitute the variable with the indicated information.
If the Add Header to the first page only option is enabled, the Header will be applied only on the first page of every printed document.
Position: Specifies the position of the Header. Position can be set up to Left/Center/Right.
The X Offset (+/-) and Y Offset (+/-) settings specify the distance relatively from the edge of the page and the specified position. The units used to specify offsets are set with the Units dropdown list. Supported units are tenths of mm, hundredths of an inch, and pixels.
|
|
For example, if the Header is set to Left, the X Offset (+/-) is 100, the Y Offset (+/-) is 200 and the units are pixels, then the Header will be positioned to 100 pixels of distance from the left edge of the page and 200 pixels of distance from the top edge of the page.
|
|
Also, if the Footer is set to Center, the X Offset (+/-) is 0, the Y Offset (+/-) is -100 and the units are pixels, then the Footer will be positioned horizontally to the center of the page and 100 pixels of distance from the bottom edge of the page.
|
Font Customization: Users can customize the Header font type, size, style in the Font Customization window.
Color: Users can customize the color of the Header.
Header Background: Specifies whether to use opaque or transparent background for the header.
Opaque: The header’s background is opaque.
Transparent: The header’s background is transparent.
Text Preview: Shows the predicted header text with the substituted variables.
Preview: Shows the preview of the configured arrangement and size of the header.