When installing API/RTK on an operating system, all versions of the ActiveX controls are installed (32-bit, 64-bit, ARM64), but only one version of the controls can be registered on the system. Please see the following table to see which ActiveX Controls can be registered when installing the API/RTK on certain operating systems.
|
|
32-bit Operating System |
64-bit Operating System |
ARM64 Operating System |
|
Only 32 bit API/RTK Installed |
Can be registered. |
Can be registered. |
Can be registered. |
|
64-bit ActiveX Controls |
Cannot be registered. |
Can be registered. |
Can be registered. |
|
ARM64 ActiveX Controls |
Cannot be registered. |
Cannot be registered. |
Can be registered. |
When developing applications targeting both Intel/AMD x64 and ARM64 systems, it is recommended to use the 64-bit ActiveX Controls and compile your application to x64.
Compiling C# or VB.NET Applications for the “Any CPU” target is not recommended because of the following complications:
“Any CPU” applications normally run as 32-bit applications on 32-bit systems, and 64-bit applications on 64-bit systems, unless the “Prefer 32-bit” option is turned on in Visual Studio. On ARM64 systems, applications can run as 64-bit applications or ARM64 applications depending on the .NET framework version used for compiling the application. This makes it difficult to predict which ActiveX control should be registered on the system.
You can register the ActiveX controls during installation, or using the batch files placed in the API/RTK Installation directory.
|
Run the batch files as Administrator, or disable the UAC (User Account Control) in Control Panel > User Accounts > Change User Account Control Settings for the user account who run the batch files to ensure sufficient permission for registering the OCX files. |
32-bit ActiveX Controls
Open a Command Line As Administrator, navigate to the RTK installation folder where the batch files are located and type the batch file name to run. Alternatively, run the following batch file As Administrator:
<RTK Installation Folder>\<RTK 32 bit>\Register_32bit_OCXs.bat
<RTK Installation Folder>\<RTK 32 bit>\UnRegister_32bit_OCXs.bat
64-bit ActiveX Controls
Open a Command Line As Administrator, navigate to the RTK installation folder where the batch files are located and type the batch file name to run. Alternatively, run the following batch file As Administrator:
<RTK Installation Folder>\<RTK 64 bit>\Register_64bit_OCXs.bat
<RTK Installation Folder>\<RTK 64 bit>\UnRegister_64bit_OCXs.bat
ARM64 ActiveX Controls
Open a Command Line As Administrator, navigate to the RTK installation folder where the batch files are located and type the batch file name to run. Alternatively, run the following batch file As Administrator:
<RTK Installation Folder>\<RTK ARM64>\Register_ARM64_OCXs.bat
<RTK Installation Folder>\<RTK ARM64>\UnRegister_ARM64_OCXs.bat
NOTE: When the 64-bit ActiveX Controls are registered, the 32-bit API/RTK Sample Applications cannot be used and developers cannot rebuild certain 32-bit API/RTK projects which use ActiveX Controls and vice versa.
The ARM64 ActiveX Controls can only be registered on ARM64 operating systems. The ARM64 Controls are built as ARM64X binaries, so they can be used by both regular 64-bit and native ARM64 applications when registered on a Windows 11 ARM64 operating system. The name of the ARM64 ActiveX Controls ends with an ‘A’ character, e.g.: BlackIceDEVMODEA.ocx and BiPrnDrvA.ocx.
Registering OCX controls manually
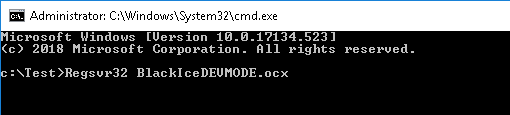
Alternatively you can use the regsvr32.exe command line utility. Open a command line (the command line has to be run with Administrator privileges). navigate to the directory of the OCX file and type in the following command to register a control:
regsvr32.exe "name of the ocx file"
Example:
Registering the BlackIceDEVMODE.ocx:
BlackIceDEVMODE files location:
For 32-bit Application:
[Installed RTK]\RTK 32 bit\BlackIceDEVMODE\
For 64-bit Application:
[Installed RTK]\RTK 64 bit\BlackIceDEVMODE\
For ARM64 Application:
[Installed RTK]\RTK ARM64\BlackIceDEVMODE\
Copy the BlackIceDEVMODE.dll and BlackIceDEVMODE.ocx (or BlackIceDEVMODEA.dll and BlackIceDEVMODEA.ocx in case of ARM64) files into the same directory (Example: c:\Test).
Copy the executable file of the sample/application, the DLLs, ActiveX interop files (Interop.BLACKICEDEVMODELib.dll) and .ini files into the same directory(Example: c:\Test).
Run a command line (cmd.exe) as Administrator.
In the command line, navigate to the directory where the executable file, DLLs, ActiveX files and .ini files are placed (Example: c:\Test).
For Example:
Global Settings C# Sample.exe
Interop.BLACKICEDEVMODELib.dll
SampleSettings.ini
BlackIceDEVMODE.dll
BlackIceDEVMODE.ocx
In the command line execute the following command:
Regsvr32 BlackIceDEVMODE.ocx
(In case of registering the ARM64 control: Regsvr32 BlackIceDEVMODEA.ocx)
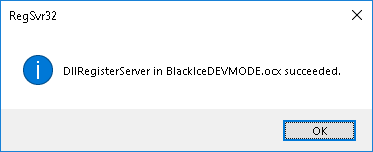
After the registration is successful users can use the .Net application with the BlackIceDEVMODE ActiveX control.
To unregister the control, add the /u switch to the command (the command line has to be run with Administrator privileges).
regsvr32.exe /u "name of the ocx file"
Example:
Unregistering the BlackIceDEVMODE.ocx:
Open a command line (cmd.exe) with administrative privileges
In the command line navigate to the directory where the executable file, DLLs, and ActiveX files are placed
In the command line execute the following command:
Regsvr32 /u BlackIceDEVMODE.ocx
Adding Reference to the ActiveX Controls in Your C# or VB.NET Project
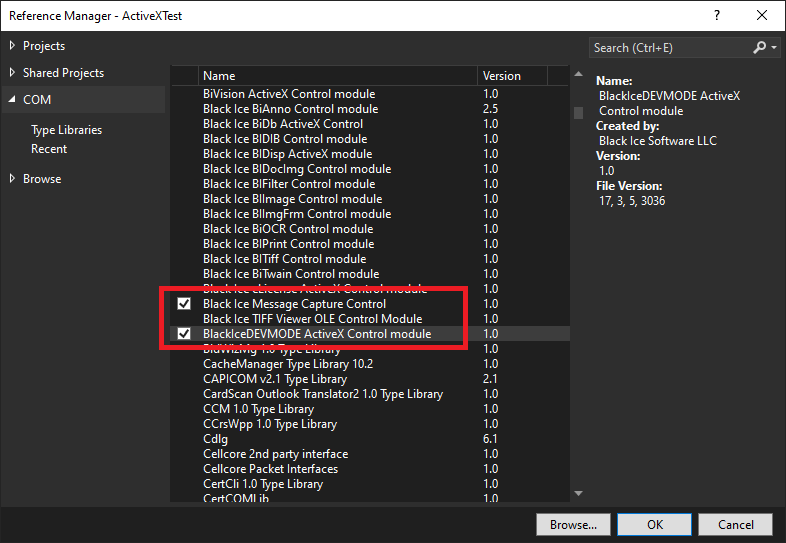
Go to Visual Studio, open Your C# or VB.NET Project, and right-click on the References > Add COM Reference... option in the Solution Explorer.
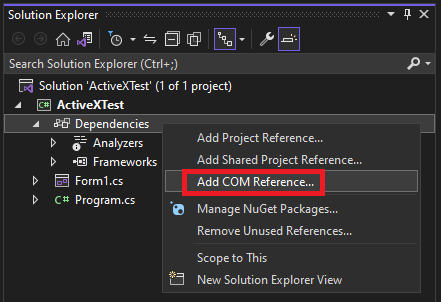
Choose the ActiveX control you want to use, and click OK.
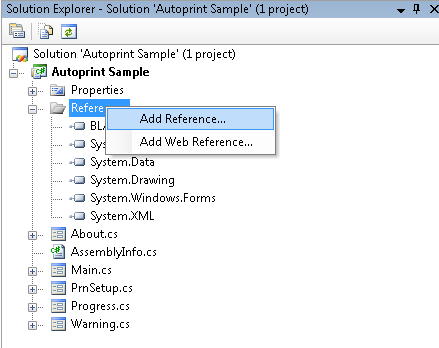
Adding Reference to the ActiveX Controls in Your C# Project in Visual Studio 2005 or earlier
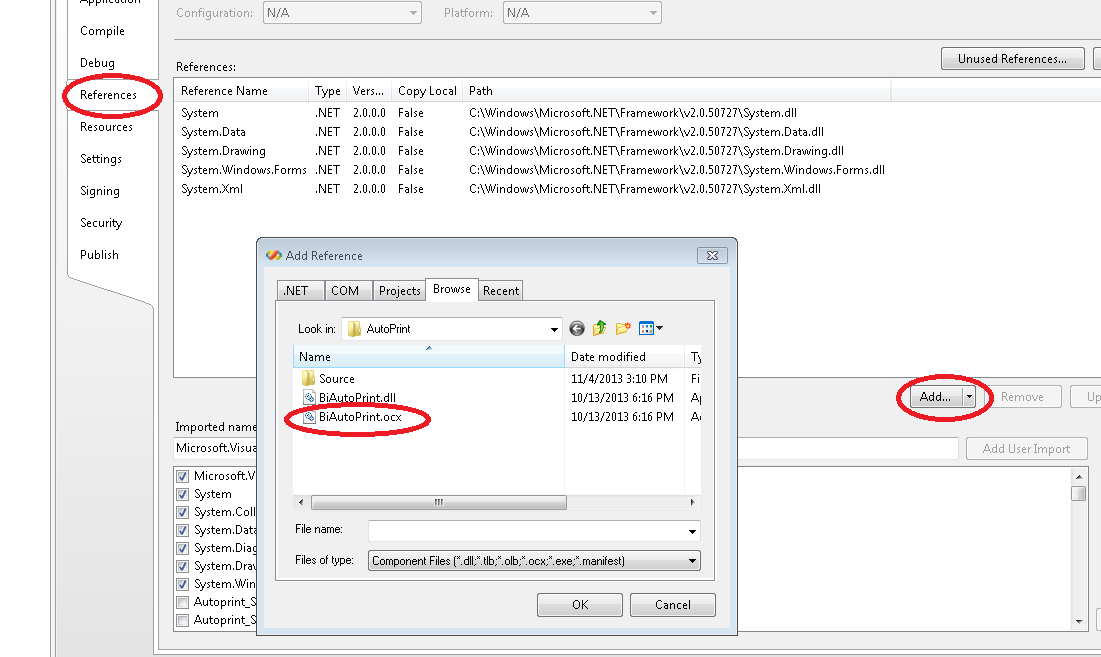
Go to Visual Studio, open the Your C# Project, and right click on the References > Add Reference... option at the Solution Explorer.
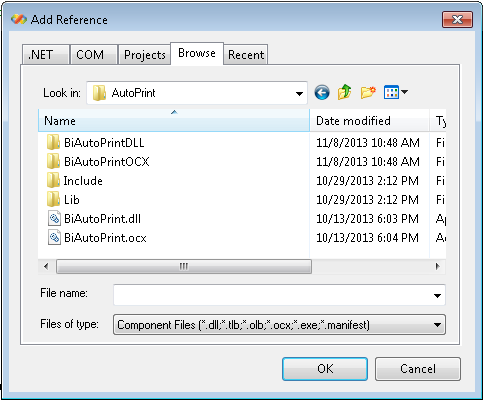
Browse the ActiveX Control and Click OK.
Example:
"c:\Program Files\Black Ice Software LLC\Black Ice ColorPlus RTK for Printer Driver\RTK 32 bit\AutoPrint\BiAutoPrint.ocx"
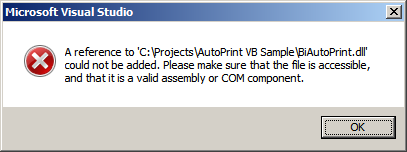
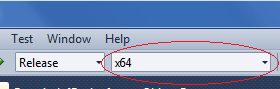
Note: If you receive the following error message when trying to Add the reference under Browse tab, please check if the reference is a valid assembly under COM tab, and try to Add the reference also from COM tab again, and make sure you set the build platform to x64 in the project:
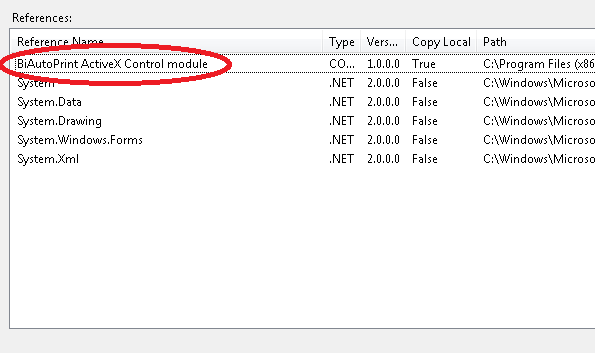
As a result the Lib will be added to the Visual Studio references.
Example:
BIAUTOPRINTLib

Build your project with the registered ActiveX control.
Adding Reference to the ActiveX Controls in Your VB.NET Project in Visual Studio 2005 or earlier
Go to Visual Studio, open the Your VB.NET Project, and right click on the Properties option at the Solution Explorer.
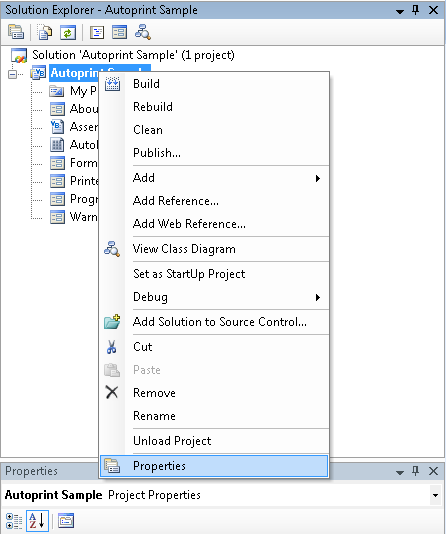
Select References tab on the left side and click on Add... button. Browse to find the ActiveX Control to and Click OK.
Example:
"c:\Program Files\Black Ice Software LLC\Black Ice ColorPlus RTK for Printer Driver\RTK 32 bit\AutoPrint\BiAutoPrint.ocx"
Note: If you receive the following error message when trying to Add the reference under Browse tab, please check if the reference is a valid assembly under COM tab, and try to Add the reference also from COM tab again, and make sure you set the build platform to x64 in the project:
As a result the ActiveX Control module will be added to the Visual Studio references.
Example:
BiAutoPrint ActiveX Control module