Black Ice Software -
December 7, 2010
NEW: Save As
dialog - Options button
Black Ice Software released 13.04 printer driver with new additions for the “Save As” post printing feature. When the ‘Enable Save As’ option is selected, the Save As dialog will be displayed each time before saving
a file. From version 13.04 of the Black Ice Printer
Drivers, for certain file formats additional settings can be specified
.
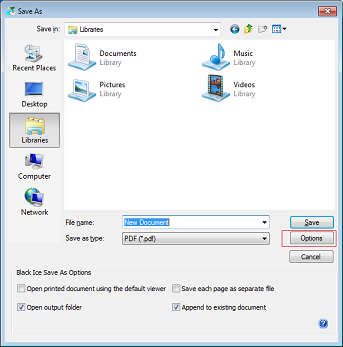
Available options will change according to the selected file format. E.g for PDF file format
the document description, embed fonts, compression and security settings can be specified in the Save as dialog.
Configuring the SaveAs dialog:
Options settings using the BlackIceDEVMODE DLL and OCX
The DEVMODE data structure contains information about the initialization and environment of a printer device. The BlackIceDEVMODE DLL and OCX are designed for developers to retrieve or modify the settings of the Black Ice printer using C, C++, C#, VB, VB.NET or Delphi programming languages. Both the DLL and the OCX are contained in the Resource Toolkit.
The SaveAs dialog Options settings can be retrieved or changed programmatically during and after the installation using the following
newly added functions:
| GetSaveAsOptionDefaultValue |
SetSaveAsOptionDefaultValue |
| GetSaveAsOptionDefaultString |
SetSaveAsOptionDefaultString |
| GetSaveAsOptionDefStringAtPos |
SetSaveAsOptionDefStringAtPos |
Read more about the API functions in the online documentation.
Printing Tips for Developers:How to change printing methods in BiAutoPrint?
The BiAutoPrint.dll uses the following applications to convert documents to another format:
- Microsoft Office Word
- Microsoft Office Excel
- Microsoft Office Power Point
- Adobe Acrobat Reader
- Notepad
- Microsoft Visio
- AutoCAD
- Internet Explorer
- Black Ice Imaging API
The BiAutoPrint.dll uses these programs/API to print the documents without any user interaction.
If some printing application can’t be used the printing methods can be modified easily in the BiAutoPrint.dll. The entire C++ source code of BiAutoPrint.dll is available in the release printer driver resource toolkit so the printing methods can be changed.
For example the txt documents shouldn’t be printed with Notepad. In this case the
PrintTXTDocument function is needed to be changed in the
StartPrintingW function of the BiAutoPrint.dll:
else if (!_wcsicmp(p+1, L"txt"))
{
bRet = PrintTXTDocument(pPrinter, pFileName);
}
The first parameter of the PrintTXTDocument is the name of the printer; the second parameter is the path and filename of the text file to print.
Note: The new printing method has to convert the document without any user interaction for automate background conversion.
How to use MemoryImage event on Windows 7?
The MemoryImage event can be used for generating the printed document in the memory instead of writing it to
a disk. Generating images into memory is useful if the images aren’t needed to save into file. For example the printed images are stored in
a database.
The TIFF and bitmap file formats support the memory image feature. To enable this feature the
Generate output in memory checkbox should be checked at the
File Formats tab of the printing preferences. If the
Generate output in memory is enabled no output file will be generated in the output folder of the printer driver. In this case the printed image can be accessed only through the MemoryImage event. The MemoryImage event is implemented in the BiPrnDrv.ocx. Note: For getting printer driver messages on Windows 7 the PIPE message interface of the printer driver has to be used. The following C# code snippet demonstrates how to save the printed memory image into
a file.
private void BiPrnDrv_MemoryImage( object sender, AxBIPRNDRVLib. _DBiPrnDrvEvents_MemoryImageEvent e)
{
// Save the file
FileStream fs =
File.Create( "C:\\Image.tif"); fs.Write(( byte[])e.data, 0, e.size);
fs.Close();
}
|


