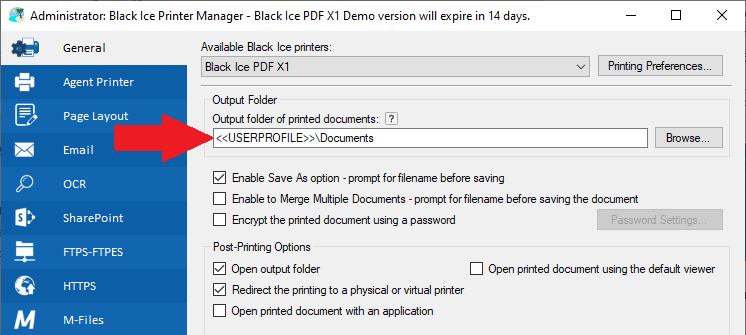
Configure the output file directory for all users. Environment variables can be used to apply global output directory settings with user-specific folders. Make sure that the printer driver has the appropriate permissions to create the files in the directory.
The output folder can be a folder on the local network. The network folder can be specified using a mapped network drive, or using the machine name like in the following example: \\Test_PC\images. Make sure that the printer driver has the appropriate permissions to create the files to the network directory.
The output folder cannot be a relative path. For example:
.\Images
..\Images
\Images
The output folder cannot start with ‘.’, ‘..’, ‘/’ or a single ‘\’ character.
Output folder can be specified with maximum 259 characters, digits and any special characters except: < > / * ? “ |
Enable Save As option - prompt for filename before saving
When the Enable Save As option is selected, the Save As dialog is displayed each time before printing the file. The Black Ice Save As dialog is very similar to the regular Windows Save As dialog, except that the previous one contains additional Black Ice options.

While the regular Windows Save As dialog is displayed when the Save As option has been chosen from the file menu, the Black Ice Save As Dialog is displayed when the document is printed to a Black Ice printer that has the Enable Save As option selected:
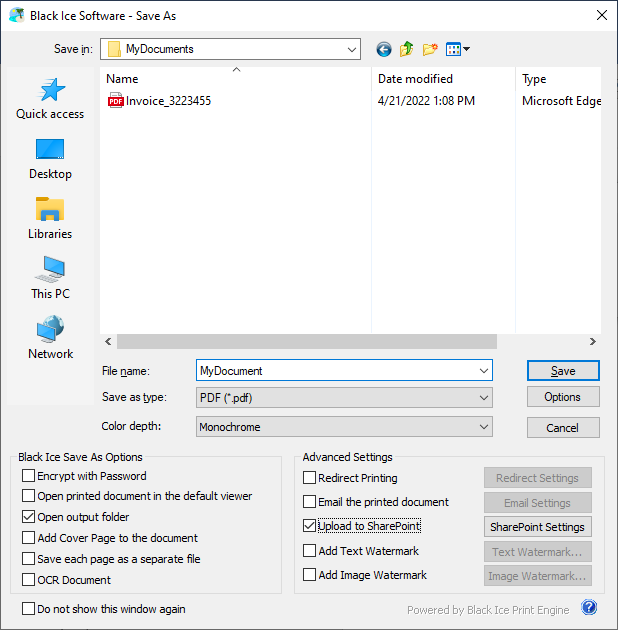
Options - For certain file formats additional settings can be specified for example, compression methods, embedded font settings, and so on. Available options change according to the selected file format.
Color Depth - Sets the color depth for the generated image. The value can be 1 bit, 8 bits, 8 bits grayscale and 24 bits. Certain file formats do not support all the available color depth options.
Encrypt with password - When enabled, users are able to generate encrypted PDF documents even if the Encrypt the printed document using a password option is disabled on the Printer Manager > General tab. The user will be prompted with the “Encrypt with Password” window to enter a password for the printed document and select the protection type of Viewing and Editing. If no encryption is selected on the PDF Settings > Security tab, the document will be encrypted with 256-bit AES encryption (Acrobat X or later). The password must be a maximum of 32 characters. To read more about PDF encryption, please see the Security options section of the manual.
Open printed document using the default viewer - When enabled, the generated output document opens in the default program for that file type (extension).
Open output folder - If this option is enabled, the designated output directory opens in Windows Explorer after the print job is completed.
Add Cover Page to the document – If this option is enabled, the user can select and insert a cover page as the first page of the printed document during the printing process. After the printing has finished, the document will be opened in the default form filler application (for example IceViewer TIFF, IceViewer PDF, IceViewer Pro, Adobe Reader, or Foxit Reader). To read more about how to add a cover page to documents, please refer to the Add Cover Page section of the manual.
Save each page as separate file - When this option is enabled, the Printer Driver prints every page of a multipage document into a separate file. If the Save each page as a separate file option is enabled, the Add Cover Page to the document option is not available.
For example:
If the user prints a four-page document (e.g., MyDocument.doc) into PDF file format, each page will be saved into a separate PDF document. The first page will be generated with the original file name, and subsequent files will include an underscore and three digits in their names indicating the page numbers. The following output files will be generated:
MyDocument.pdf
MyDocument_002.pdf
MyDocument_003.pdf
MyDocument_004.pdf
Black Ice Save As Options - Advanced Settings
Send a Printed Document in an Email
Upload to SharePoint using the Save As dialog
Add Text Watermark or Stamp on the Save As Dialog
Add Image Watermark or Stamp on the Save As Dialog