The BiBatchConverter Service Manager is a 24/7 service-based document converter that can monitor multiple folders and their subdirectories simultaneously, converting any printable file into editable PDF, Compact PDF, PDF/A, TIFF, Fax, JPEG, PNG, and other formats. It features an intuitive interface for easy configuration and real-time monitoring of document conversions.
The BiBatchConverter Service Manager is part of the BiBatchConverter and the BiBatchConverter Server.


- Installing the BiBatchConverter Service
- Configuration of the BiBatchConverter Service Manager
- Starting the conversion
- Automatic: The service starts automatically when Windows starts.
- Manual: The service must be started manually every time after Windows starts.
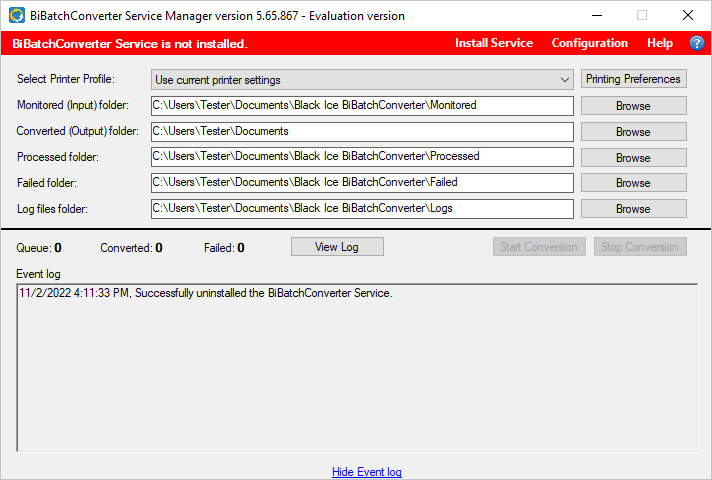
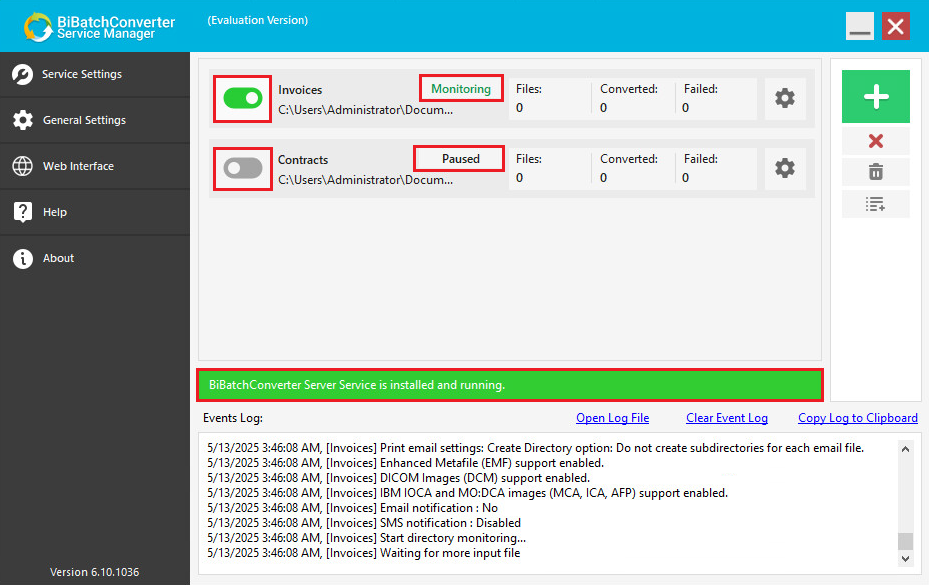
- Red: The service is not installed. The Administrator must install it through the BiBatchConverter Service Manager.
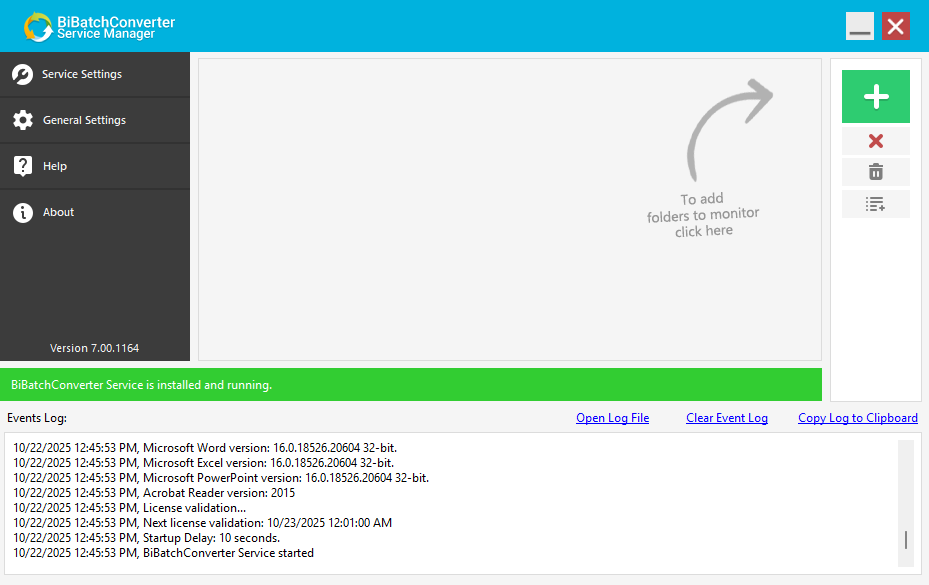
- Orange: The service is installed but not running. To activate it, go to Service Settings and click Start Service or use the Stop Service button to halt the service when needed.
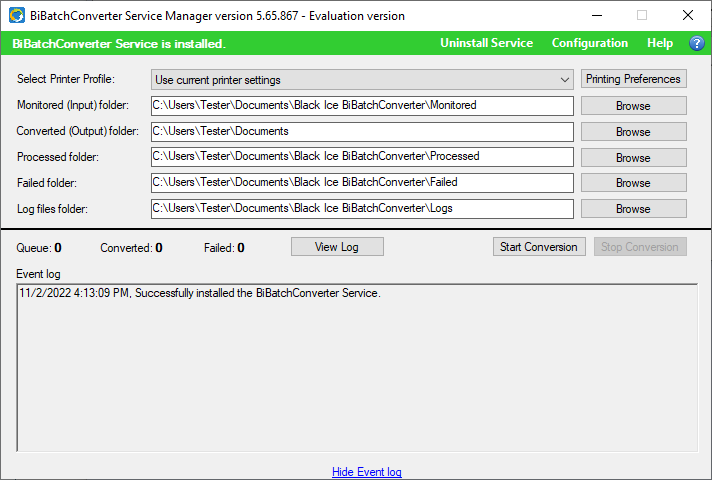
- Green: The service is installed, running, and ready for configuration and document conversion.
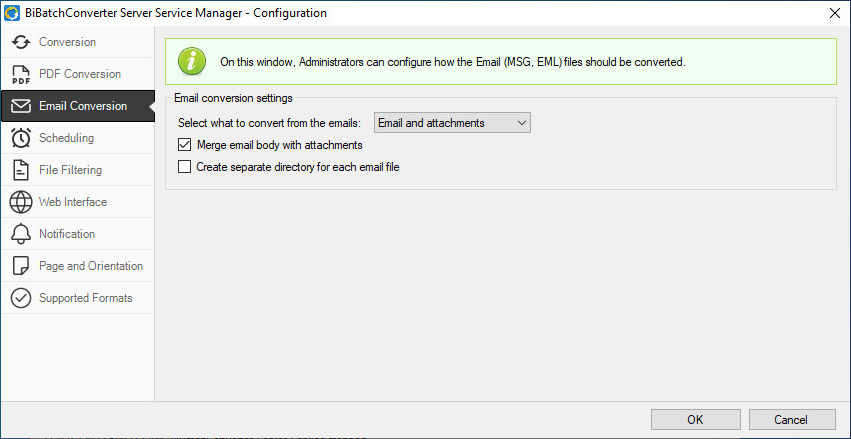
- Email and attachment – Converts both the email (including From, Sent, To, and Subject fields) and every attachment as separate documents.
- Email only – Converts only the email, including From, Sent, To, and Subject fields. Attachments are ignored.
- Email body and attachment – Converts the email body (excluding From, Sent, To, and Subject fields) and attachments as separate documents.
- Email body only – Converts only the email body. Ignores From, Sent, To, and Subject fields and attachments.
- Email attachment only – Converts only the attachments and ignores the email content.
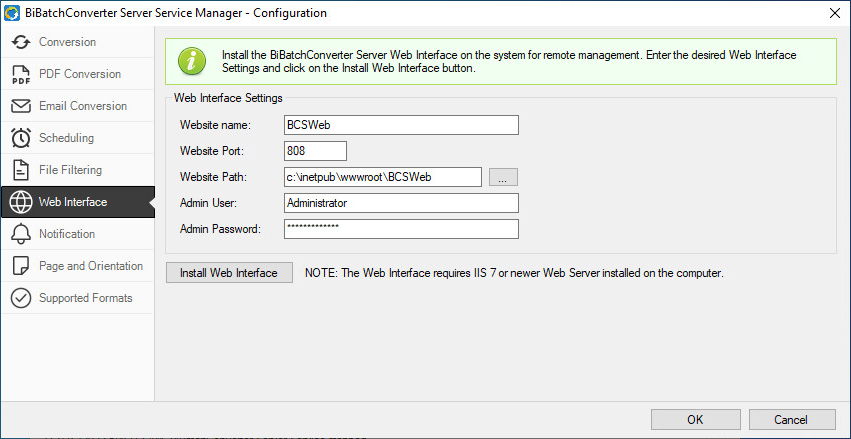
- The Website name will be the newly created website’s name in the IIS. The website name can be a maximum of 64 characters.
- The Website Port will be the default binding associated with the website. For example: If you use 808 as Website Port, then the website will accessible through the following URL: http://serveripaddress:808
- The Port Number can be between 0 and 65536.
- The Website Path must point to the directory where the web interface files will be stored. The Website Path can be a maximum of 260 characters.
- The Admin User must be a username of an administrator account that will be assigned for the website. This administrator account requires access to the BiBatchConverter Server installation directory.
- The Admin Password must be the password for the provided administrator account.
Benefits of document conversion running the BiBatchConverter Service
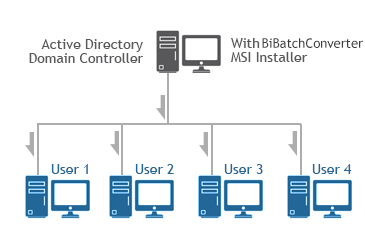
The BiBatchConverter Service can run under "Administrator" account instead of under a particular user or System Account. This allows the service to continue the document conversion even after the current user logs off in unattended mode.
This page covers information about the following topics:
Installing the BiBatchConverter Service
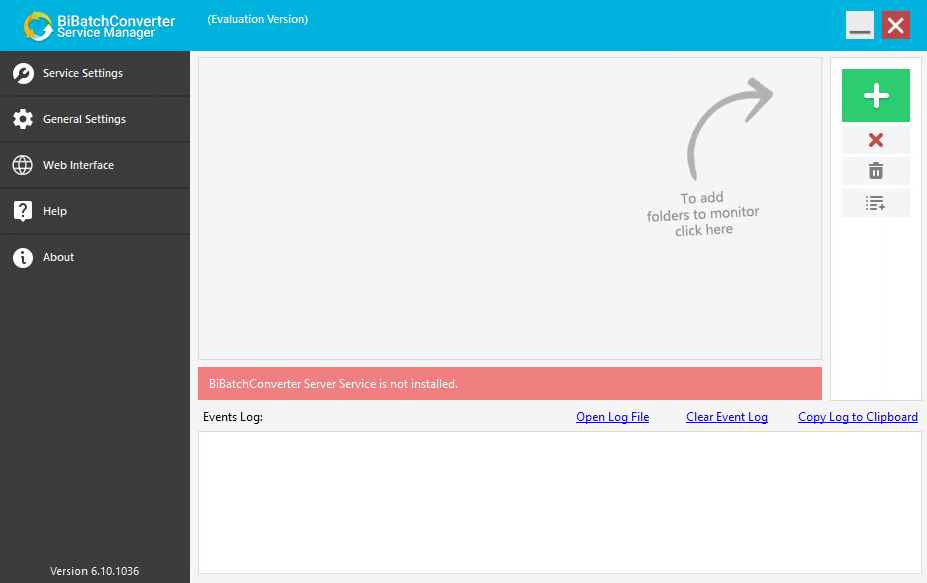
When the BiBatchConverter Service Manager is launched for the first time and the service was not installed during the installation process, a red ribbon appears in the user interface indicating that the service is not installed. To install the service, click the Service Settings button.
Please note, if the service was installed during installation, a green ribbon will appear confirming that the BiBatchConverter Service is installed and running. To start or stop the service, uninstall it, or configure the service start mode and startup delay options, click the Service Settings button.
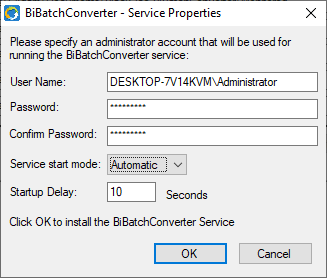
On the Service Properties window, enter the username and password of the Administrator, then configure the Service Start Mode and Startup Delay options as needed.
The BiBatchConverter Service must run under a local administrator account who already once logged in on the computer. The BiBatchConverter Service cannot run under a system account.
Service Start Mode:
Startup Delay
Specifies the time in seconds to start the conversion process by the service after the service is started. The purpose of the Startup Delay is to make sure that certain required processes used by the service for conversions are started and running before service starts the conversion. The default Startup Delay is 10 seconds.
When the configuration is finished, click on the Install BiBatchConverter Service button. The following window appears if the service was installed successfully.
Please click the OK button. The BiBatchConverter Service starts automatically.
To manually start or stop the service, please use the Start Service and Stop Service buttons on the Service Properties window.
Service Status
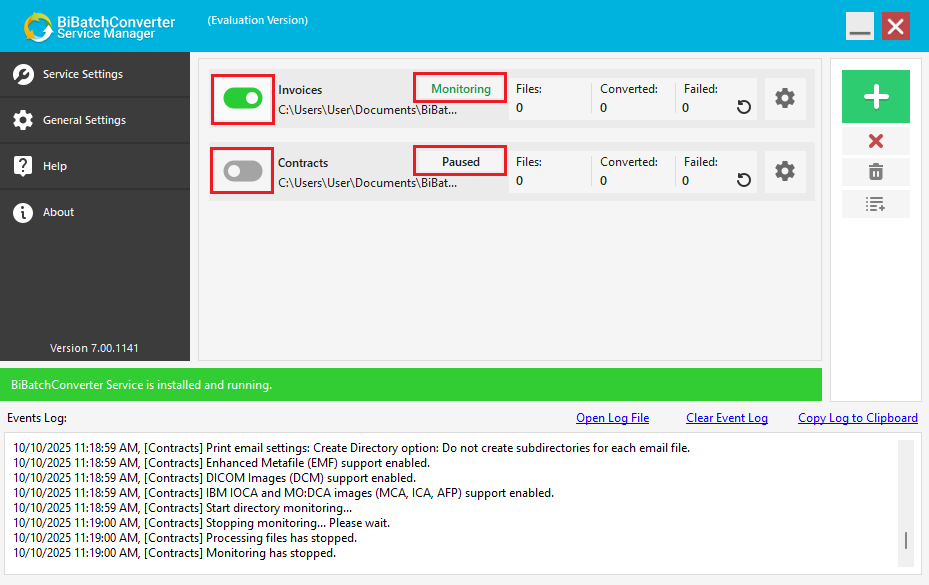
On the BiBatchConverter Service Manager user interface, a colored ribbon indicates the current status of the BiBatchConverter Service:
For more information on how to configure folder monitoring and conversion, please refer to the Document Conversion Configuration section of the manual. To read more about how to start the conversion, please see the Starting the Conversion section.
Configuration of the BiBatchConverter Service Manager
The BiBatchConverter Service can monitor multiple folders simultaneously to automate the document conversion process. To configure folder monitoring and conversion settings, the user must create a new task that monitors a specified folder. Multiple tasks can be created, each with its own input and output folders and customized settings. Each task can operate independently and simultaneously, allowing the BiBatchConverter Service to handle diverse conversion requirements across various document types, destinations, and processing rules.
Adding or editing a monitored Task
To create a new monitored task, click the Add Monitored Task... button ( ) in the BiBatchConverter Service Manager. The Task Configuration window will appear, allowing the user to define folder paths and apply the desired conversion settings.
After completing the configuration, click the OK button in the Configuration window. BiBatchConverter will begin monitoring and converting files automatically. To pause or resume monitoring and conversion for a specific task, use the Start/Pause toggle button (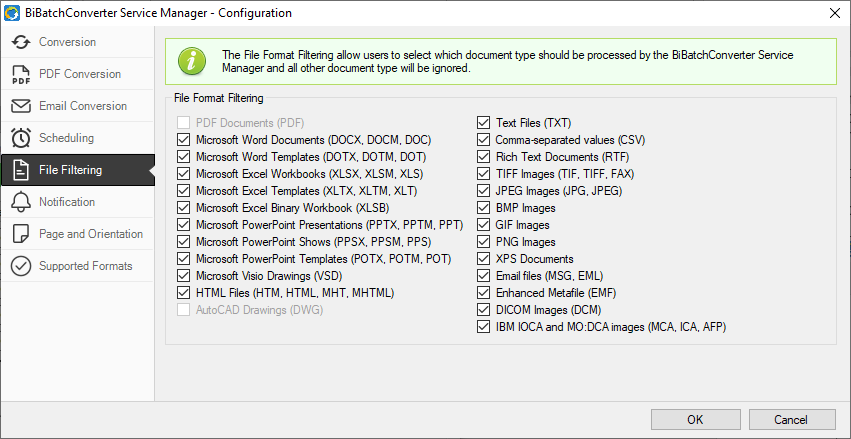 ).
).
To edit the configurations of an existing task, please click the Open Task Settings…(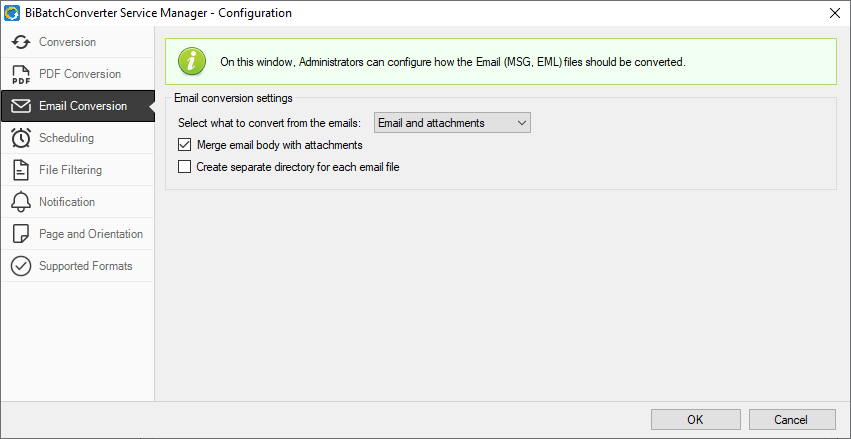 ) button that will open the Task Configuration window.
Directory Monitoring
On the Directory Monitoring tab, the task name, monitored folders, and folder monitoring settings can be configured.

Account Name
Display Name: The name of the created task. The name cannot contain special characters or spaces, only letters, digits and dash (-) characters.
Monitored Folder Settings
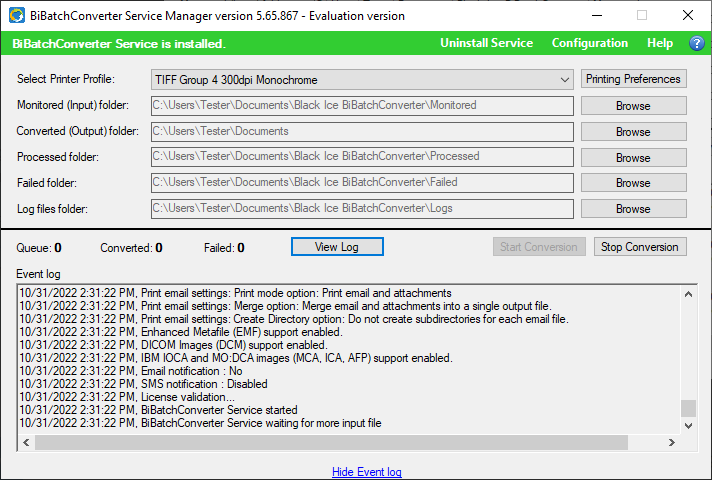
The Monitored Folder Settings section allows users to configure the directories for input, output, processed, and failed documents during the conversion process.
Monitored (Input) Folder: The directory containing the documents to be converted. This folder is continuously monitored for new files that need conversion.
Converted (Output) Folder: The directory where successfully converted documents will be saved. If not configured, the converted documents will be automatically placed in the default output directory of the Printer Driver.
Processed Folder: The directory where original documents will be stored after being successfully processed and converted.
Failed Folder: The directory where files that cannot be converted will be moved, ensuring that failed conversions are kept separate for review and troubleshooting.
The BiBatchConverter Service supports using UNC paths (for example: \\MyServer\Documents\OutputFolder) and shared network folders, to let users access converted documents from the client computer through the network. To learn more, please see the Monitor Shared Network Directory using UNC Path section of the manual.
Folder Monitoring Settings
Process Subdirectories: The Process Subdirectories option enables the conversion of documents located in the subdirectories of the monitored directories.
Delete Empty Subdirectories: The Delete Empty Subdirectories option automatically deletes any empty subdirectories within the specified input directory after processing.
Map Processed Subdirectories: The Map Processed Subdirectories option mirrors the subdirectories and folder structure of the original monitored directories. It is particularly useful when there are multiple subdirectories or a categorized folder structure. If disabled, BiBatchConverter will convert every document and place them directly in the Output directory, without maintaining the original folder structure.
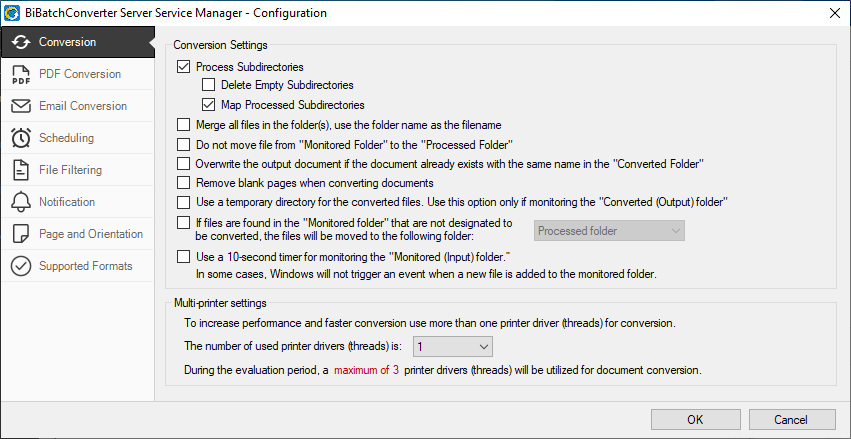
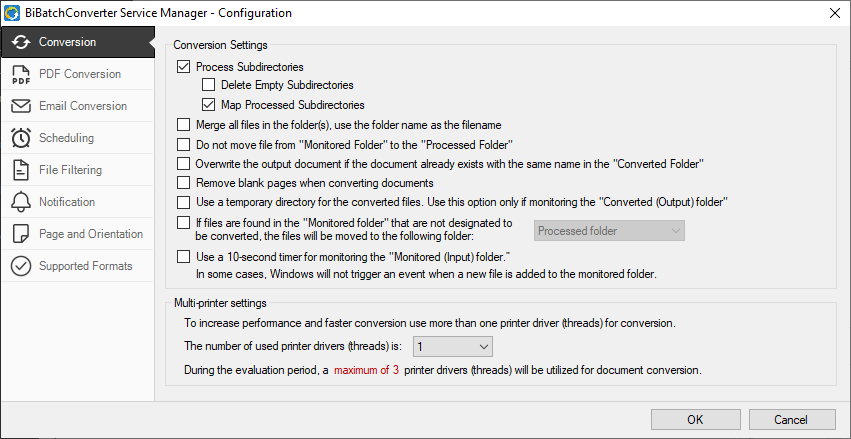
Conversion Settings
On the Conversion tab, the printer profile and document processing settings can be configured.
Select Printer Profile
Applies a predefined printer profile for document conversion. To modify the printer settings, click the Printing Preferences button and adjust the BiBatchConverter printer configuration as needed.
Merge all files in the folder(s), use the folder name as the filename
If enabled, every file in the monitored directory will be merged, and the filename of the merged output file will be the name of the folder.
For example:
If the folder name is "C:\Monitored\John-Doe\Case# 50-2023-DR-001805-XXXX-SB" the output file name will be "Case# 50-2023-DR-001805-XXXX-SB.PDF" if one is converting to PDF, or "Case# 50-2023-DR-001805-XXXX-SB.tif" if one is converting to TIFF.
If the output file already exists in the destination folder, the BiBatchConverter Service will append the new files to the existing document. If the output file does not exist, the BiBatchConverter Service will create the file automatically.
Do not move file from "Monitored Folder" to the "Processed Folder"
If enabled, successfully converted documents will be deleted from the source (Monitored) folder instead of being moved to the Processed Folder.
Overwrite output document if the document already exists with the same name in the "Converted Folder" If enabled, documents in the "Converted Folder" will be overwritten if they already exist with the same name.
Remove blank pages when converting documents
If enabled, the BiBatchConverter Service will remove blank pages from the converted document.
If the document being converted consists of a single blank page, no output file will be generated.
Use a temporary directory for the converted files
If enabled, the converted document will first be moved to the temporary directory. Once the conversion is complete, the document will be moved to the destination (Processed) directory. This option helps users track successfully converted documents, excluding the documents still under conversion.
If files are found in the "Monitored folder" that are not designated to be converted, the files will be moved to the following folder:
If enabled, files found in the "Monitored Folder" that are not designated for conversion will be moved to the folder selected from the dropdown menu next to this option.
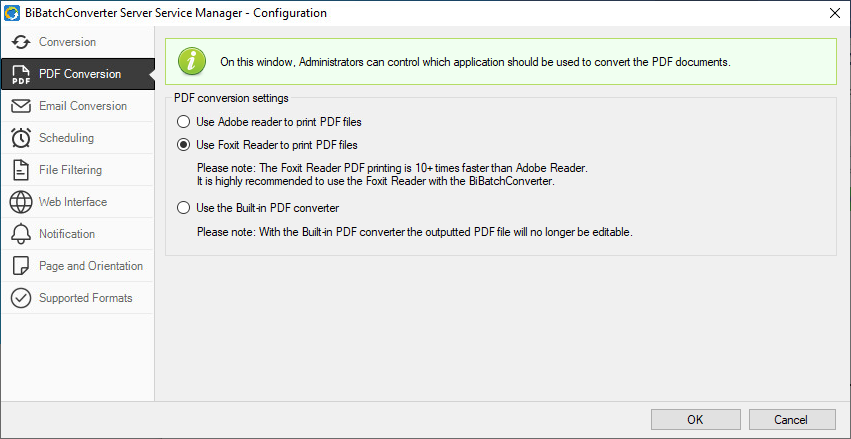
PDF Converter Settings
Under the PDF Conversion tab, the application used for PDF conversion can be selected. The BiBatchConverter Service supports 32-bit Adobe Reader 10 or higher, 32-bit Adobe Acrobat Pro 10 or higher, and Foxit Reader 9.6 or higher.
By default, Adobe Reader or Foxit Reader option will be selected, depending on which application is installed on the computer. If both applications are available, Foxit Reader will be selected by default.
If Adobe Reader and Foxit Reader are not available, users can utilize the built-in PDF converter for PDF generation. Please note, by using the built-in PDF converter, the converted PDF document will no longer be editable.
The Use the Built-in PDF to Text converter option enables BiBatchConverter to extract text directly from PDF documents without relying on Adobe Reader or Foxit Reader. When the Use the Built-in PDF to Text converter option is selected, the BiBatchConverter Service bypasses the printer and all printer-related configuration settings. The generated output will always be a plain text file, regardless of the configured output format on the Conversion tab.
Email File Conversion Options
The Email Conversion tab, contains settings for printing email files with .MSG, and .EML extension.
Users can select which part of the email should be converted:
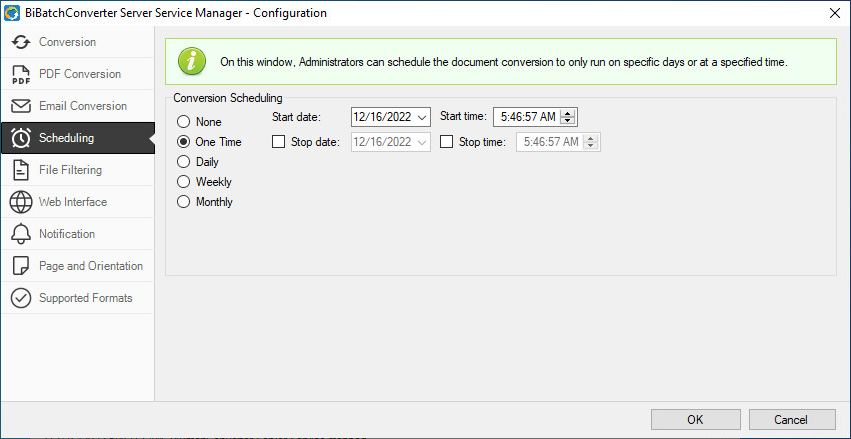
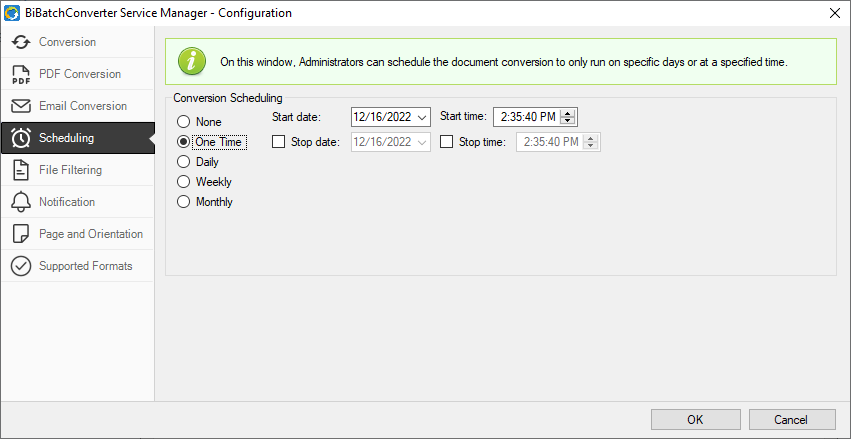
Scheduling
The Scheduling Settings define when the BiBatchConverter Service processes documents from the configured input directory.
Always
If selected, scheduling is disabled and the service processes documents immediately as they appear in the input directory.
One Time
This option starts and stops the conversion at a specific date and time. No further documents will be processed until the scheduling configuration is changed.
Daily
Starts and stops the conversion at specified times every day.
Weekly
Starts and stops the conversion at specified times on selected day(s) of the week. Multiple days can be selected.
Monthly (Days)
Starts and stops the conversion at specified times on selected calendar days each month.
Monthly (Weeks)
Starts and stops the conversion based on selected weeks and days of the month.
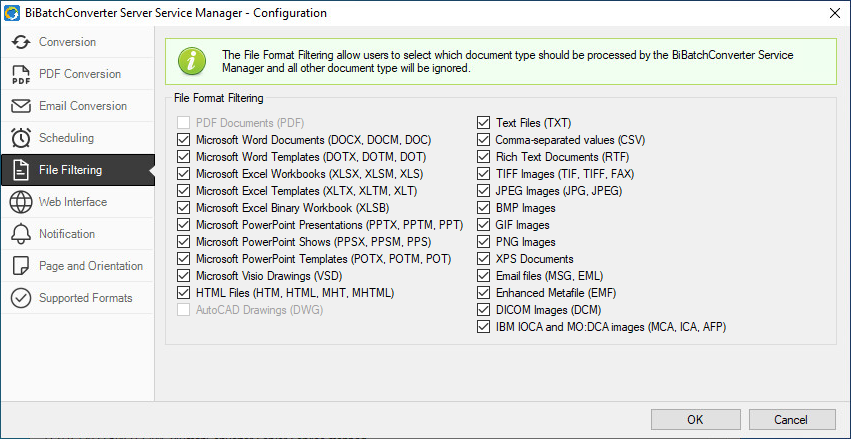
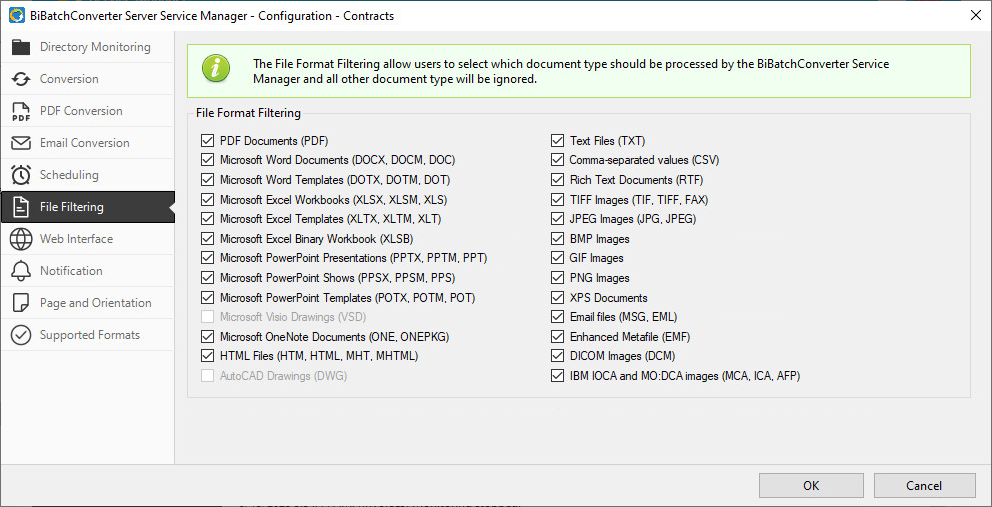
File Format Filtering
Under the File Filtering tab, users and administrators can specify which document types should be processed by the BiBatchConverter Service Manager. Every other file type will be ignored.
For example:
If only the Microsoft Word Documents option is selected, the BiBatchConverter Service Manager will process only Microsoft Word files with the extensions .DOCX, .DOCM, and .DOC.
Installing the Web Interface
NOTE: Only available in the Server version of the BiBatchConverter.
To install the BiBatchConverter Server Web interface, please navigate to the BiBatchConverter Server Service Manager > Configuration > Web Interface tab.
Once each field is filled, click on the Install Web Interface button.
To read more about the BiBatchConverter Server Web Interface, please refer to The BiBatchConverter Server Web Interface section of the online manual.
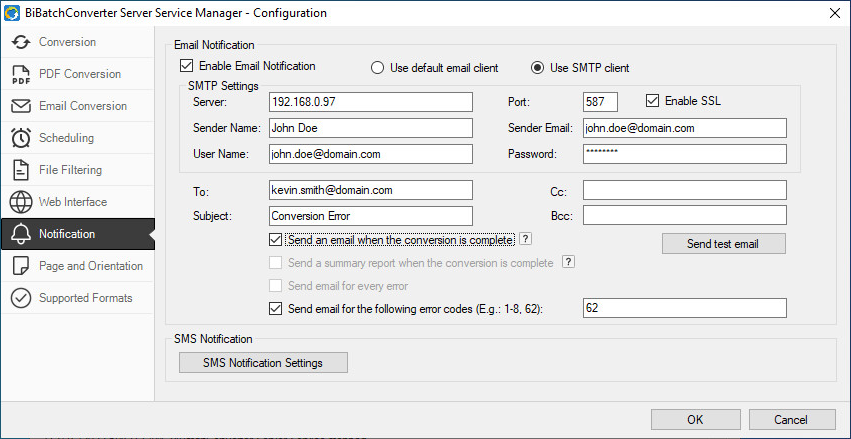
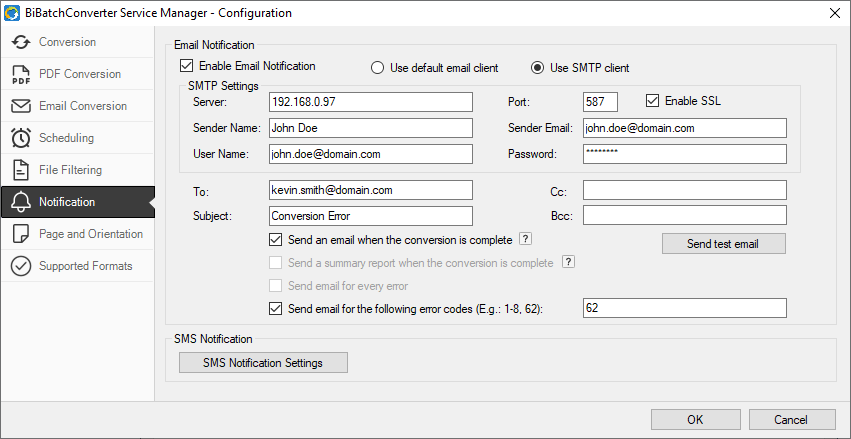
Email notifications
Email Notification covers settings to setup email notification sending if the conversion has finished, or the service has stopped. To enable the email notification feature, check the Enable Email Notification checkbox, and fill the required information.
To read more about Email notifications, please refer to the Email Notification section of the online manual.
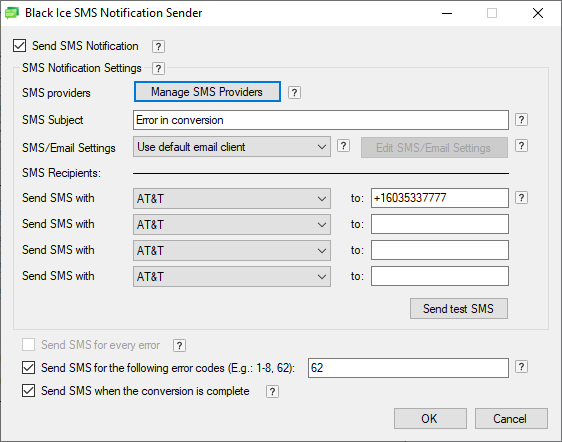
SMS notifications
The BiBatchConverter is able to send SMS notifications to users in several stages during the document conversion. To set up the SMS notification, navigate to the Configuration window > Notification tab and click on the SMS Notification Settings button.
To read more about SMS notifications, please refer to the SMS Notification Configuration section of the online manual.

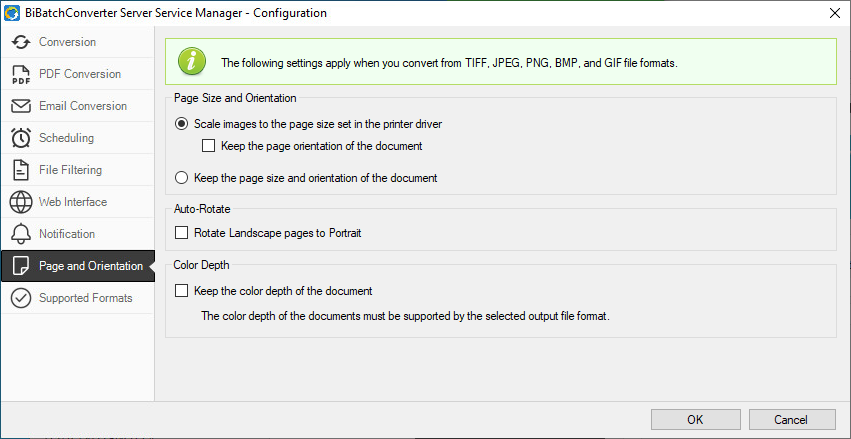
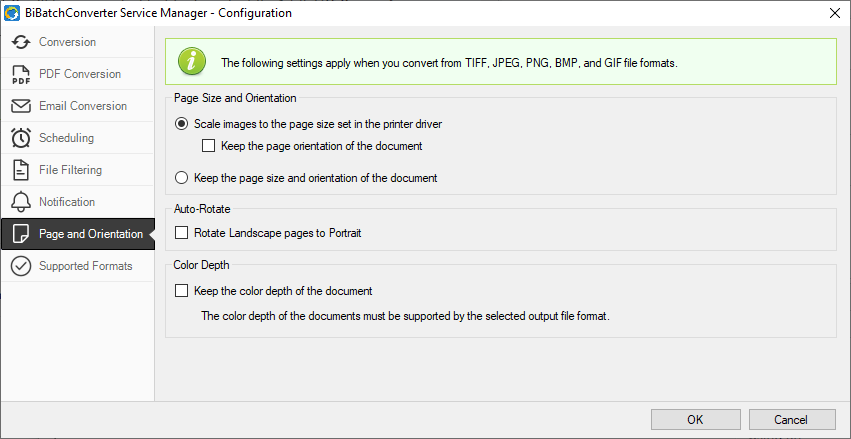
Page and Orientation
Under the Page and Orientation tab users and administrators can configure the BiBatchConverter Service to automatically detect the converted document image size and the page orientation.
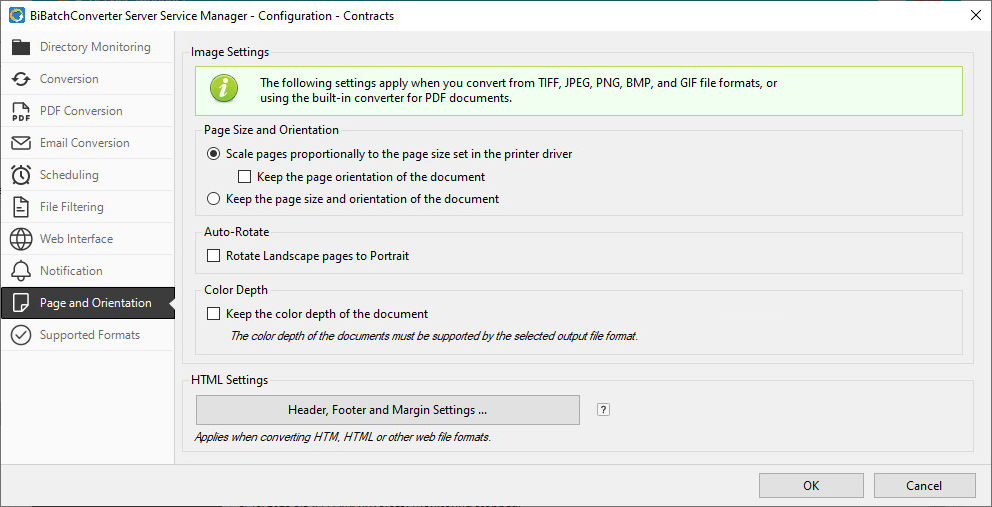
Scale images to the page size set in the printer driver
The page size of the output files will be the same as the page size set in the printer under Printing Preferences > Device Settings tab. If the converted document page size is different than the printer driver page size the document will be scaled to the printer driver page size.
Keep the page orientation of the document
If enabled, the original page orientation of the document will be preserved during conversion. The page size of the output file will follow the setting specified in the printer driver under Printing Preferences > Device Settings.
Keep the page size and orientation of the document
If enabled, the original document page size and orientation will be kept for the output document.
Rotate Landscape page to Portrait
If enabled, landscape pages in the converted document will be automatically rotated 90 degrees to fit portrait orientation.
Keep the color depth of the document (1-bit, 8-bit, or 24-bit)
If enabled, the original color depth of the document (1-bit, 8-bit, or 24-bit) will be preserved in the output file.
NOTE: The selected output file format must support the original color depth. For example; if a color 24-bit JPEG is converted and the output format is TIFF Group 4 is selected, the 24-bit JPEG will be converted to black and white 1-bit Tiff Group 4.
NOTE: Settings under the Image Conversion tab only apply to TIFF, JPEG, PNG, BMP, and GIF file formats.
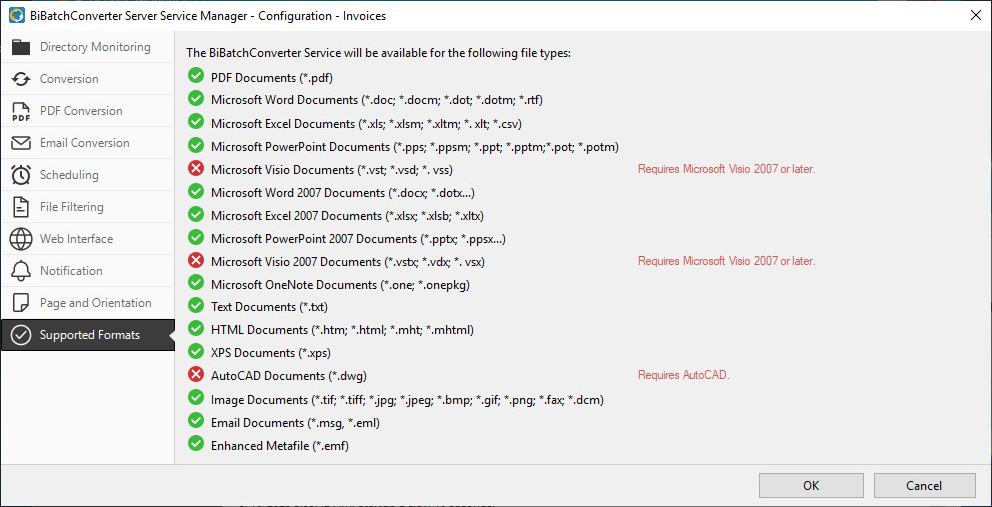
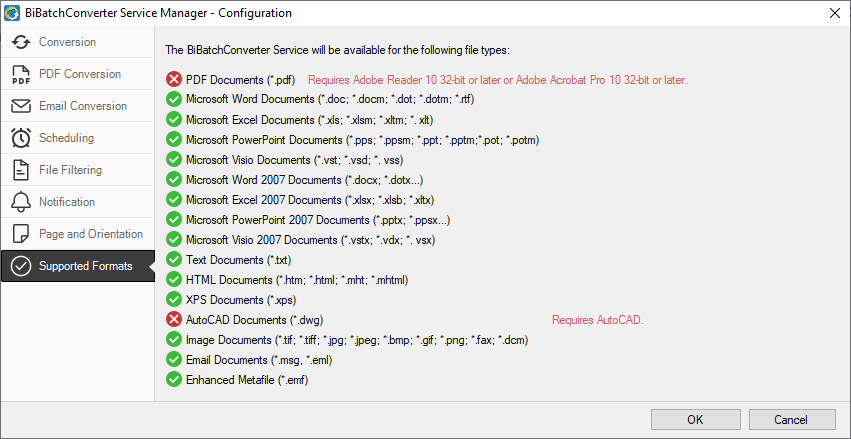
Supported Formats
To review the detected applications for the supported file formats, navigate to Configuration > Supported Formats tab. The BiBatchConverter Service will be able to convert the file formats marked with green.

Starting the Conversion
Before starting the conversion, please make sure the BiBatchConverter Service is running. A green ribbon on the BiBatchConverter Service Manager user interface is indicating if the service is running.

If the service is not running, please select the Service Settings option on the BiBatchConverter Service Manager user interface and click on the Start Service button.
The BiBatchConverter Service will then start monitoring the input directory and processing the files. To ensure that folder monitoring and conversion are active, verify that the desired tasks are running in the BiBatchConverter Service Manager user interface.